Nexus smartphone rooting and custom recovery guide
Here comes the first of a series of articles for Nexus phone users. They say that you haven’t experienced Nexus if you have not rooted the phone and loaded either a custom ROM or a enhancement kernel. Here is a simple guide on how you can unlock the boot loader, root the Nexus, take a full backup of phone. At first, I thought that the process is very hard (thanks to using phones like Mi3, GS3) but Nexus phones are extremely easy to root. After all, these are meant for developers. Do note that these modifications will void the warranty on your phone and do not try any of these when your phone is on low battery2 or on a computer that is not connected to a UPS. Neither GadgetDetail nor the author can be held responsible if you end up with a bricked phone while performing these steps. Try this at your own risk.

You will lose all the data on your phone including messages, call log so it is better if you take a backup of your data and have a backup, follow these steps:
- Open your device’s Settings .
- Under “Personal,” touch Backup & reset.
- Touch Back up my data and switch it on.
- If you have more than one Google Account on your device: Touch Backup account and choose the one you want to set as your backup account.
- If you don’t already have a backup account on your device, touch Backup account to add one.
- Once the backup is complete (this will not take backup of your text messages), you are good to go
The Process:
- Install JDK and Android Studio
- Take a full backup
- Unlock bootloader
- Install Custom Recovery
- Root the phone
- Install 3rd party Kernel
- Setup tuning
- Install 3rd party ROM
- Install GApps
In this post, we will be covering 1-5 and we will cover 6-9 in another post later.
Install JDK and Android Studio
First thing to do is to install JDK and Android Studio. Android Studio contains Android SDK tools and we will be using these tools initially to take a backup of the phone and to unlock the bootloader. You can download Android Studio from Android Developer site and JDK from java.com. If you are using Windows, Android SDK Tools are usually copied to c:\Users\<username>\AppData\Local\Android\sdk. Fastboot.exe and adb.exe are two tools that we will be using a bit and these reside under platform-tools directory. Once you have installed the tools and JDK, boot your Nexus in fastboot mode (Power + VolDown) and connect the phone to the computer using USB cable. Do note that the ‘USB Debugging’ mode should be enabled in settings before you reboot your phone. Once the phone is connected, drivers are downloaded and installed. Once the driver installation process is complete, go to command line window, cd to platform-tools directory and run ‘fastboot devices’ and it should show the serial number of your phone. If the output is blank, it means that your phone is not detected. Repeat the process of booting into fastboot mode and installing drivers.
Take a full Backup
The usual process to take a full back up is by using custom recovery but given that your phone is not yet rooted, you have to use the adb tool to take backup of your phone. Boot your phone into fastboot mode and run the following command
adb backup -apk -shared -all -f C:\nexus_first_backup
You are now asked to provide a password (to encrypt the backup) and you can either input password or skip encryption. We strongly recommend encrtyping your phone’s backup as it will contain private data and you do not want that to get into wrong hands.
Bootloader Unlock process
- Reboot your phone now (if it is still in bootloader/fastboot mode).
- Go to Setttings -> About Phone and scroll to the bottom of the list.
- Keep tapping on ‘Build Number’ till you see a message that you have activated Developer options.
- Open the Developer Options menu and enable ‘Enable OEM Unlock’ by tapping on the checkbox.
- If you have not yet enabled ‘USB Debugging’, do that now.
- Boot into fastboot mode again (Power+VolDown), connect the phone to PC
Open command window, go to platform-tools and run the following command to check if the phone is detected
fastboot devices
If you are able to see the phone, run the following command (DO NOTE THAT THIS COMMAND WILL ERASE EVERYTHING ON YOUR PHONE).
fastboot oem unlock
You are now asked to confirm this action. If you are sure to go ahead, hightlight ‘YES” using volume keys and press the power button to select YES.
Now, reboot your phone by running the following command
fastboot reboot
At this point, your phone’s bootloader is unlocked and you are ready to load custom recovery and root the phone.
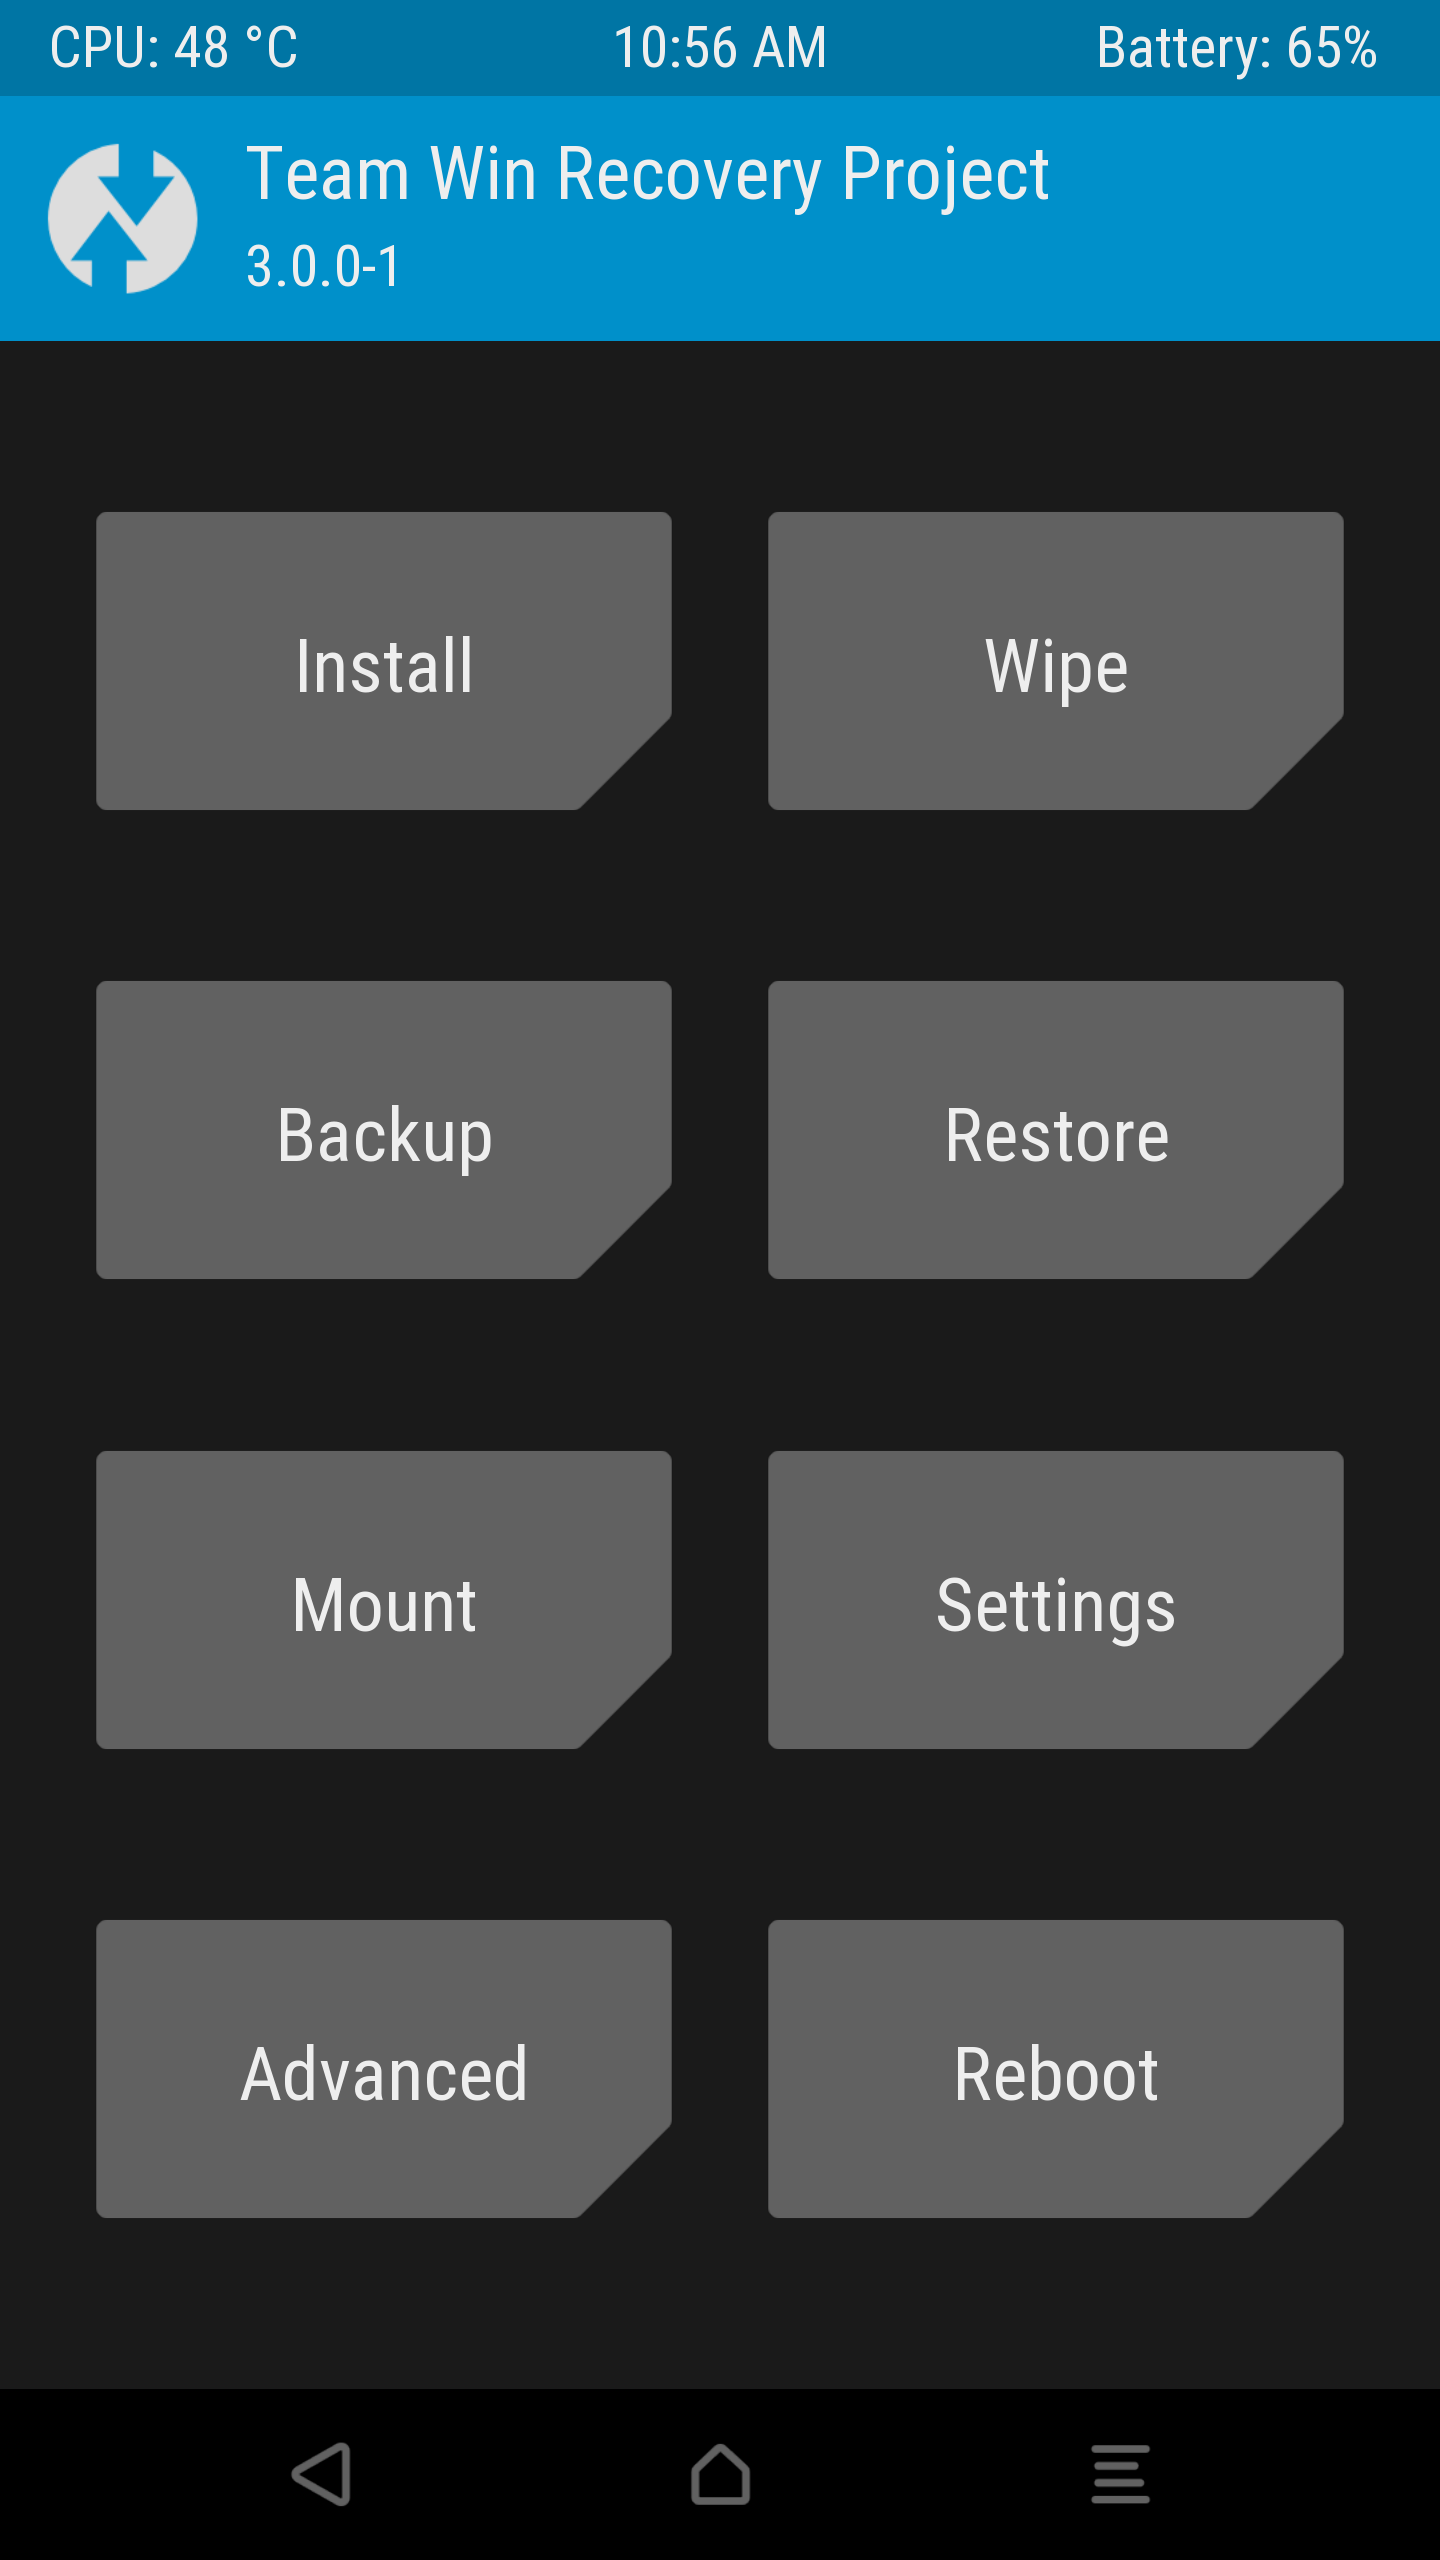
Load TWRP custom recovery Image
You can download TWRP image for your phone from this link. Copy the image file to root of c: or d: and rename the image file to recovery.img.
To install ClockworkMod recovery, you can install the ROM Manager application from Google Play Store and then install ClockWorkMod recovery.
Connect the phone to computer in fastboot/bootloader mode (you know the drill).
Go to platform-tools folder and run the following command
fastboot flash recovery c:\recovery.img
Use the volume keys now to scroll to ‘Restart Bootloader’ and select this option using power key.
Once you are back in bootloader, use the volume keys to select ‘Recovery Mode’ and select this option.
You should now see something like this screen (if you are opted for TWRP). This means that your phone now has a custom recovery (TWRP) and that you can now install a custom ROM or root your phone.

Let there be root access
- Rooting a phone simply means that you are enabled to use root access (a.k.a administrator access in windows world) to perform operations that require elevated permission.
- Download SuperSU image from this link.
- Copy the image to your phone and boot your phone into bootloader.
- In bootloader, select ‘recovery mode’. Once you are in recovery mode, click on ‘Install’.
- From the file manager, select the SuperSU zip file and scroll the bar to install SuperSU.
- Post installation, you will see message that the phone is now rooted.
To test the same, you can reboot the phone, go to Google Play Store and install SuperSU from Google Play Store. From the SuperSU application, you can check if root access is enabled for you phone and you can also decide which apps can get root access and for how long.